Raptor Forum banner

Raptor 350 General Information, Tips & Tricks

104K views 61 replies 14 participants last post by  Sixpack577  
#1 · (Edited)
The purpose of this post is my general thoughts and ideas surrounding the Raptor 350s I have bought and maintained. I would like to have a discussion regarding some hot topics on the 350 raptors in this was well, what works and what doesnt in regard to owing and working on the 350s.

I buy raptor 350s because of several factors but mostly the reliability and simplicity over the 660s and 700s. Plus 350s go fast enough for me. I call 350s the honda civic of ATVs, easy to work on, easy to get parts, easy to ride and not expensive.

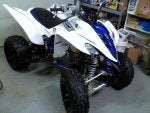
First, history. I have owned four 350s. For numerous reasons I bought and sold my 350s and my forth one is what i always wanted. A 2007 special edition white and blue carbon frame. Very white and very clean with 15 hours on it when I got it. I have a whole process I go through to check them out before riding season and to ensure they are operating within factory specifications and also safe. Basically I go through the entire bike to check it out and replace whats needed.

Here's a short list:

1. clean entire bike thoroughly
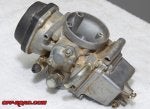
2. clean carb and factory jet if no mods are present. yes you can clean and confirm jets are factory sizes. nothing sucks more than a crappy running raptor only to find out the jets were installed wrong sized or whatever. several of my raptors had the wrong jets or clogged jets or dirty carbs. rebuilding the carb isnt hard but there isnt instructions out there clearly. so you have to dig around.
3. I go through the owners manual and service manual to see how things need to be adjusted after initial break in
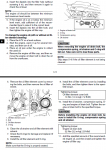
4. I adjust the intake and exhaust values to the minimal specs. my 350s engines run SUPER quiet with litle ticking or engine noises.
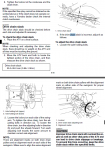
5. I change the oil and oil filters and check the strainer on the bottom. And MAN is it a pain in the ass changing the oil in 350s. The spring on the bottom! No wonder people strip the oil drain plug. The spring makes it very hard to get the plug back into the bottom of the case. Also, the oil filter is odd in that the filter is smashed between the oil filter housing and the cover... meaning when you screw the oil filter cover on the outside, it secures the oil filter inside which feels odd. Just doesnt feel like normal yamaha quality.
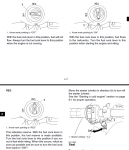
6. I check timing and timing chain tension and check and reset the actual tensioner.
7. I clean the chain and drive gears and lube them.
8. I clean and polish the headlight lenses to make them look new.
9. check the brakes and adjust cables and check brake pads and brake disks and brake fluid level.
10. I check for any modifications from the previous owners to make sure they are done correctly and dont damage anything. also slip on exhausts and other things require rejetting so you have to ensure all modifications dont damage something else.
11. check all handlebar mount screws and bolts to ensure they are torqued correctly and safe
12. check battery voltage and fuses and stator voltage for proper electrical system operation
13. check shocks and adjust to your preference
14. read spark plug after several rides to determine mixture setting and operating conditions inside cylinder
15. lube and grease all chassis locations
16. clutch level adjustment and clutch health assessment

Short Raptor 350 Buying Tips
========================================

Theres alot I check out when I buy the 350 but you only have so much time. I call this the 'Raptor 350 Basic Sales Inspection'. You generally look over the bike and check things, start it up, listen to the engine, basically check it out the best you can. If you take 60 minutes OR LONGER talking to the seller and checking out the Raptor the seller often thinks you are a reseller or dealer trying to buy used ATVs (i found this out the hard way LOL).

After I buy the Raptor I check the whole bike in what I call 'Raptor 350 Operational and Safety Check'. The engines seem to take alot of abuse just fine, so if you find a 350 with low hours, minimal wear and tear and good oil (oil to the correct level, looks new, smells new and it not super stinky old oil or smells like gasoline), chances are you will get a GREAT quad for 1800-3500 depending on factors such as region, demand, market, condition, use, service history, title, etc.

Keep in mind the above is a short list of things I do when I buy a Raptor but it can apply to ANY ATV or even a car (i've owned MANY cars too). You may not have the time or resources to PSI test the cylinder when you look to buy a Raptor or ATV. And honestly.. I should.. but dont. I find gently used Raptors from guys who let them sit in garages because they wanted to ride their 660s or 700s more. Im totally good with 350s. Like I said before, they go fast enough for my needs. Im an old dude. Well no.

Seems like most of the problems with 350s are centric around fuel delivery. Basically from the tank through the carb to the jets to the intake valve most people are either running to lean or rich or something is clogged along the fuel delivery path. This leads to backfiring or running hot (lean mix) or hard starting or throttle response issues in mid and open throttle. This is due to something changing the exhaust most commonly and not changing the air or fuel system to match the modification.

Anyway. Your thoughts are welcome here. General ideas or changes you have done on your 350. I would break it up into individual posts but theres too many to cover. These are just all the things I do when I get a 350 to make it run amazing!

I run in the southwest desert so I run yamaha oil filters and 20w-40 wet clutch oil as its always 50+ degrees where I run and 350s seem to run hot.

I run mostly clean stock 350s as I dont buy them to super mod them out. I want a reliable quad to ride and not have to work on every weekend. I want to ride and not be a atv mechanic. I do basic changes. One may be a headlight bulb change from filament H6 to a H6 LED. I dont want to do HID as I dont want to worry about heat or ballast mounting location. I may do a rear taillight filament to LED as well. I also dont run a spark arrestor or baffle as some call it but the baffle is already inside the exhaust pipe itself. Without the spark arrestor it has a meaner sound that costs $0 and most dont have to rejet the carb and it causes no engine issues. Some say it hurts the exhaust valve but few to none have confirmed this.

Anyway. Any thoughts on 350s welcome here.
 

Attachments

#2 ·
Also. Feel free to ask me anything in relation to the things I have listed above and I can give you tips or information on how to adjust or fix them. The dealer wanted $345 for three hours of work to adjust the valves and I just found out to do it myself in 30-45 minutes to yamaha specs for $5.00.

Also on the other side, if YOU have a TIP or TRICK please put it in here WITH PICTURES if you can to help others as they work and fix and update their 350s!
 
#43 ·
I can't tell where mine is coming from. I had the valves adjusted and they told me it was either loose timing chain or camshaft... I want to rebuild it and fix noise. What's a good set up to go with? I would like the rebuild to give it more power. What mods are done ; big gun slip on exhaust with jet kit, twist grip, 2 tooth up on front sprocket, nerf bars, handle bars, brush guards, 4 tires, front bumper, a arms, controls arms, bushings, front and rear bearings. I'm sure I'm missing something. As far as the rebuild? What would you suggest?


Sent from my iPhone using Tapatalk
 
#4 ·
Lots of good advice. WELCOME TO THE FORUM.
 
#5 · (Edited)
Raptor 350 Fuel Tank Capacity from Yamaha Owners and Service Manual

======================================================

Total Fuel: 2.38 Gallons (fuel selector in ON position)

Fuel Reserve Amount: 0.71 Gallons (fuel selector in RESERVE position)

Note: For a raptor that will ONLY run in RESERVE position, this means your pickup inside your tank is clogged and the tank must be removed from the 350 and fuel petcock unbolted with two bolted and BOTH pickups cleaned out.
 

Attachments

#6 ·
Raptor 350 Engine and Transmission Oil Capacity from Yamaha Owners and Service Manual

==================================================

2.64 quart without oil filter replacement
2.75 quart WITH oil filter replacement

Oil Filter runs $14 from yamaha OEM or $10 from TusK or $8 from K&N.

General Oil Change Procedure (from Rivieraneo) , USE THE OWNERS and SERVICE MANAUAL FOR COMPLETE INSTRUCTIONS

- Place quad on level surface.
- Start engine and let it warm up for several minutes
- Stop engine and place oil pan under engine
- remove dipstick
- remove plastic lower frame cover with (4) 10mm bolts, THIS SAVES ON A HUGE MESS OF OIL THAT IT COLLECTS
- remove drain plug from bottom of case, take note of order of O ring, Compression spring and oil strainer.
- Drain engine oil
- When oil is draining, remove (3) bolts on small side circular cover to access oil filter
- careful not to loose o ring on cover
- remove old filter and replace with new one
- Inspect O ring, if damaged, replace with new one
- Apply a little bit of lithium soap grease to o ring and install new oil filter, o ring and filter cover
- tighten down oil filter cover bolts to NO more than 7lb's
- After oil finishes draining from bottom install the oil strainer, compression ring, o ring and drain plug back on bottom of quad (put them back in the correct order)
- Tighten down bottom drain plug to NO more than 31lb's
- Fill engine back up with oil through dip stick (approx 2.5 quarts) of WET CLUTCH SAFE OIL
- Check oil level and make sure its at proper level
- Run bike for about 2 minutes, stop and check oil level and add if needed.
 

Attachments

#7 ·
Raptor 350 Air Filter Cleaning from Yamaha Owners and Service Manual

==================================================

This is rather straight forward.

- General Air Filter Clean/Change Procedure, USE THE OWNERS and SERVICE MANAUAL FOR COMPLETE INSTRUCTIONS
- Remove air filter from below seat.
- If air filter is beyond cleaning buy a new one. If not, clean it. I use mild soap and water.
- Wash air filter. FOLD DRY, DO NOT TWIST FILTER to DRY. FOLD LIKE YOURE CLOSING A PAPER BACK BOOK. THIS MAKES SURE YOU DONT DAMAGE THE FILTER.
- Apply an approved air filter oil EVENLY to air filter.
- Reinstall air filter.
 

Attachments

#8 ·
This is great sound advice. I just bought a 350 for the daughter to upgrade to from a 250. I can't believe how clean it is for a 2004.

Welcome to the forum!
 
#11 · (Edited)
Thanks bud. 350s are great general purpose quads and I feel they are great value for the money. Alot of fun and not too hard to work on either. Although I have 15 years in auto mechanics so it may not be fair for me to say that. ALTHOUGH I have seen a case split open for work and i hope to NEVER have to do that. OMG what a mess of gears and funky stuff inside.
 
#9 ·
Raptor 350 General Valve Adjustment Procedure from Yamaha Owners and Service Manual

==================================================

General Valve Adjustment Procedure (partly from Pacific Barbarian) , USE THE OWNERS and SERVICE MANAUAL FOR COMPLETE INSTRUCTIONS

When do you adjust the valves? Every 25 hours or when ou hear excessive valvetrain ticking or noise from the TOP end. But be CAREFUL as valve noise may be heard toward the BOTTOM because it can echo through the engine.

You will need:
17mm socket and ratchet set.
10 mm socket.
5mm allen wrech.
feeler guage set that has stock sizes
BIG flat head screwdriver
4mm wrench

Intake
.06 ~ .10 mm (I set at .06 on my instake valve)

Exhaust
.16 ~ .20 mm (I set at .16 on my exhaust valve)

- remove seat
- remove front plastics, there's 6 screws, look around they are easy to see
- remove fuel tank by disconnecting fuel line from carb (turn fuel to OFF position) and remove tank from frame by (4) 10mm bolts
- Take off the crankcase timing mark cap, cam sprocket engine sidecover (on left side of cylinder head) and valve covers.
- Now while you have the socket on the bolt that is holding the cam sprocket on, spin the engine over with that while looking in the timing check hole on the crank. wait till the T (tdc) mark on the mag. lines up with the line on the case. The look up at youre cam sprocket and make sure that lines up with the line on the head. (make sure its a compression stroke by feelin the resistance when you turn motor).
- Now while everythings lined up, take the 10mm and loosen the jamnuts on the tappits on the rocker arms. This will allow you to adjust the tappits up or down.
- take youre feeler guage (stock specification clearance) and put it between the tappit and valve stem. then tighten the tappit down with the 4mm wrench and tighten the jamnut. Once done with both intake and exhaust valves, make sure jamnuts are TIGHT, and make sure you can fit the feeler guage you used back under the tappit but not the NEXT bigger feeler guage. CAREFUL when you tighten the nut the clearance sometimes changes!
- reinstall valve covers, head side cover, case timing plug and the tank and front plastics.

Terms you might like to know:

Tappit-called something else by yamaha....the bolt that is in the end of youre rocker arm once the valve cover is off....when engine is running it pushes down on valve stem...not hard to find.

Jamnut- the locknut that holds the tappit in place when tightened.

Feeler guages-like diff. thickness little paperlike stainless steel things used for measuring small clearances

Engine 'T' or TDC. TDC means TOP DEAD CENTER. Its when youre piston is at the highest point in the combustion chamber it will ever get.
 

Attachments

#59 ·
Raptor 350 General Valve Adjustment Procedure from Yamaha Owners and Service Manual

==================================================

General Valve Adjustment Procedure (partly from Pacific Barbarian) , USE THE OWNERS and SERVICE MANAUAL FOR COMPLETE INSTRUCTIONS

When do you adjust the valves? Every 25 hours or when ou hear excessive valvetrain ticking or noise from the TOP end. But be CAREFUL as valve noise may be heard toward the BOTTOM because it can echo through the engine.

You will need:
17mm socket and ratchet set.
10 mm socket.
5mm allen wrech.
feeler guage set that has stock sizes
BIG flat head screwdriver
4mm wrench

Intake
.06 ~ .10 mm (I set at .06 on my instake valve)

Exhaust
.16 ~ .20 mm (I set at .16 on my exhaust valve)

  • remove seat
  • remove front plastics, there's 6 screws, look around they are easy to see
  • remove fuel tank by disconnecting fuel line from carb (turn fuel to OFF position) and remove tank from frame by (4) 10mm bolts
  • Take off the crankcase timing mark cap, cam sprocket engine sidecover (on left side of cylinder head) and valve covers.
  • Now while you have the socket on the bolt that is holding the cam sprocket on, spin the engine over with that while looking in the timing check hole on the crank. wait till the T (tdc) mark on the mag. lines up with the line on the case. The look up at youre cam sprocket and make sure that lines up with the line on the head. (make sure its a compression stroke by feelin the resistance when you turn motor).
  • Now while everythings lined up, take the 10mm and loosen the jamnuts on the tappits on the rocker arms. This will allow you to adjust the tappits up or down.
  • take youre feeler guage (stock specification clearance) and put it between the tappit and valve stem. then tighten the tappit down with the 4mm wrench and tighten the jamnut. Once done with both intake and exhaust valves, make sure jamnuts are TIGHT, and make sure you can fit the feeler guage you used back under the tappit but not the NEXT bigger feeler guage. CAREFUL when you tighten the nut the clearance sometimes changes!
  • reinstall valve covers, head side cover, case timing plug and the tank and front plastics.

Terms you might like to know:

Tappit-called something else by yamaha....the bolt that is in the end of youre rocker arm once the valve cover is off....when engine is running it pushes down on valve stem...not hard to find.

Jamnut- the locknut that holds the tappit in place when tightened.

Feeler guages-like diff. thickness little paperlike stainless steel things used for measuring small clearances

Engine 'T' or TDC. TDC means TOP DEAD CENTER. Its when youre piston is at the highest point in the combustion chamber it will ever get.
I adjusted valves but it is still ticking, was fine a few days ago, is there a way to check Springs and or cam without full disassemble ?
 
#14 ·
Raptor 350 Gearing from Yamaha Owners and Service Manual

==================================================


13/38 - Factory Raptor gearing with 13 tooth front sprocket and 38 tooth rear sprocket

12t (tooth) front sprocket (overall smaller gear in size) results in more low end torque, lower top speed and shorter gears (shifting more)

14t (tooth) front sprocket (overall larger gear in size) results in less low end torque, higher top speed and longer gears (shifting less)

15t (tooth) front sprocket requires NEW chain BTW


General Comparison between Front and Rear sprocket tooth
========================================================

1 Tooth on the front sprocket equals about 3 Teeth on the rear sprocket
 

Attachments

#15 ·
Raptor 350 Headlight/Headlamp Bulb Information from Yamaha Owners and Service Manual

==================================================

Headlight Bulb Type - Krypton H6
Headlight Bulb Voltage - 12 volt
Headlight Bulb Wattage - 30 watts X 2 (right bulb + left bulb)
Can it take a LED or HID - dunnno but I will find out :)
Note: notice the TWO -elongated- contacts on the rear of this bulb and its a DUAL output, LOW and HIGH BEAM. Which may mean low beams are 30 watts X 2 = 60 watts of power on LOW and high beam adds a second set of filaments (two are in each bulb). I am pretty sure when you turn on high beams the low beam filaments stay on equalling four total on, which means 60+60+60+60=240 watts. Yes you need to know these numbers if you want to upgrade the headlights to LED or HID.

Taillight Bulb Type - Filament
Taillight Bulb Voltage - 12 volt
Taillight Bulb Wattage - 5 watts tailight | 21 watts stoplight
Can it take a LED or HID - dunnno but I will find out :)
 

Attachments

#16 · (Edited)
I will be adding the carb factory jet SIZE NUMBERS and carb rebuild instructions soon with pictures. I will also add what jets to use with what slip on exhausts.

NOTE: Dynojet and other aftermarket jet NUMBERS DO NOT MATCH Yamaha OEM jet numbers. Aftermarket uses their own numbers.

So a 142.5 OEM yamaha JET is ------NOT------- the same as a 142.5 dynojet jet.

Remember to ALWAYS confirm what jets are INSIDE your Raptor carb and if there is OEM exhaust and OEM intake (meaning the bike is mostly if not all stock) you need to have the STOCK/OEM JET sizes. One of my raptors they took off the FMF exhaust and LEFT the dynojet JET inside the carb and the bike ran like shhiiiiiii*. well not horrible but bad. Took awhile to figure out all this jet shi*.

Another good point is if you're buying a used Raptor 350 you should ALWAYS fully clean the carb or pay the dealer to do this. The amount of issues that come from a dirty or clogged carb/jets/passages are too numerous to list. You can clean a carb for under $10 bucks or pay someone for probably $50 bucks. It will save you a TON of time when your Raptor WONT start, or wont idle, or mid or high throttle is cutting out. If you buy a used Raptor 350 and expect to fill up the tank with new gas and start driving it... be prepared for problems. Fuel sitting for weeks or months in the fuel tank, tubes and carb causes major problems and MUST be cleaned.

Do you need to rebuild kit for your carb? Maybe if parts are missing or damaged. Cleaning can solve alot of problems. Should you get individual OEM jets from yamaha or a kit? sometimes. A kit contains everything you need, individual jets and parts add up.
 
#17 · (Edited)
I will also be adding wheel lug patterns and which wheels will fit the raptor 350 from other yamahas and other bikes.

If anyone has pictures of LARGER REAR (ITP holshots, mud-lites)or FRONT tires I would love to see pictures of them including the tire make and size and if you needed to get larger wheels or change any gearing/chain. Not paddles though. Not looking to run in sand.
 
#18 ·
Raptor 350 Oil Strainer and Oil Strainer Compression Spring (in regard to changing Oil and Oil Filter)
================================================================

A quick note. One key element of having a great Raptor is maintaining the oil and oil quality. This is because the ENGINE and TRANSMISSION use the SAME OIL. And not only to LUBRICATE BOTH but also the oil has a cooling function. Lack of oil or lack of QUALITY oil can lead to many problems, such as excessive bearing wear, overheating, hard shifting, hot operating temps, etc. etc.

Oil Maintaining
===================
Use the manual or the oil change procedure listed in this previous post on checking oil. You should check oil before EVERY RIDE, EVERY TIME. Ensure the oil is at the right level and the oil is in great shape. Check this when BUYING a raptor too.

Oil Change and Oil Filter Change
===================
Use the manual or the oil change procedure listed in this previous post on changing oil.

Oil Drain Plug Problem
===================
I am still working out a plan to deal with this but I kept seeing people stripping out or damaging the oil drain plug on the bottom of the case. I didnt know why this was happening until I realized the drain plug on the bottom has to compress the oil strainer compression spring and it makes installing the plug VERY DIFFICULT. You have to apply alot of pressure on the plug due to the spring and I can see how easy it would be to strip the threads in the bottom of the case. If anyone has a trick that helps please post it. The best I have came up with is using my socket wrench to compress the spring slightly with the oil drain plug, thread the plug on a COUPLE threads, take off the wrench and use my fingers to thread the plug into the case, this way I ENSURE I am not cross threading or damaging the threads. Then I torque the plug with the wrench once I cannot turn the plug anymore.

You DO NOT want to damage these threads. Be careful.
 

Attachments

#20 ·
Raptor 350 Front Shocks
==================================================

Anyone who upgraded your FRONT SHOCKS please post what exactly you have including model numbers and PICTURES! I am seeing alot of people CLAIM YFZ450 front shocks are DIRECT BOLT-ONS to raptor 350s front shock locations, but I also see others who deny this. Also include what modifications you MAY had to make on the shocks or on the raptor to get them to fit.
 

Attachments

#21 ·
Raptor 350 Headlight/Headlamp Bulb Information from Yamaha Owners and Service Manual

==================================================

Refer to prior post in this thread for more details on headlight bulbs. This is just a quick note.

Man. NO place carries H6 headlight bulbs. It seems they are very specialized bulbs. May have to modify another style bulb by taking off the mounting ring. But then there's the odd back two connectors that are elongated. I would like to upgrade the front headlight bulbs to a low energy high output LED cluster bulb. I would like to reduce running power requirements so the battery gets the full stator energy as I like running with headlights ON during the day.
 
#22 · (Edited)
Raptor 350 Model Number and Warrior Model Number and Model Number Variants from Yamaha Owners and Service Manual

==================================================

Here's a general overview of understanding Yamaha Raptor 350 model numbers and Warrior since the Raptor 350 TOOK over the Warrior 350 and many of the parts are the same (drivetrain not plastics) and the Warrior service manual is used on the Raptor 350.

1987 - 2004 Warrior 350 model = YFM350X (X=Warrior)
2005 - 2013 Raptor 350 model = YFM350RXR(C) (R=Raptor?)
2005 - 2013 Raptor 350 model = YFM350S?
2005 - 2013 Raptor 350 model = YFM350XP?
2005 - 2013 Raptor 350 model = YFM350XJ?

Warrior and Raptor History (why is this important, heck I dont know but heeere we go!)
==================

When it was first produced, the Yamaha 350 Warrior set the bar for all-terrain vehicles (ATVs). The Warrior ATV was in production for 17 years and received praise for its efficient, fun and user-friendly design. In 1987, Yamaha introduced the 350 Warrior. In 2004, that model was discontinued, and Yamaha introduced the 350 Raptor ATV in 2005 in order to improve the sport performance of the line.

The Warrior was equipped for strong, midrange pulling capabilities and was fitted with a snorkel to allow it to travel through water and mud. Its basic design, however, stayed relatively untouched: a six-speed transmission with a 350 cc, four-stroke engine, hydraulic disc brakes and long travel suspension.

In 1987, when the Warrior was introduced, it was the first-ever electric-start ATV. Over the years, the Warrior developed a cultlike following as it became the world's all-time top-selling sport ATV.

2004 was the last year Warrior 350 and 2005 was the first year Raptor 350. Plastics from the Warrior changed to the Raptor for a more sport look and the drivetrain stayed mostly the same. This is an important note to remember.

ATTACHED are images. First is the model number I mentioned before being one of many listed for Raptor 350s. Note the XR(C) at the end. Second pic is the WARRIOR -SERVICE MANUAL- and it works for the Raptor 350 but the Warrior model ends in the 'X'. I mention this again because you may see several EXTRA letters at the end of the 'YFM350'.

Finally the third is MORE LETTERS! Fun huh. Anyone knows what they all mean feel free to post.

EDITED: Just found another model number YFM350S.
 

Attachments

#23 · (Edited)
Raptor 350 Carburetor Information, Jets, Cleaning and Rebuild Information from Yamaha Owners and Service Manual

==================================================

I could easily go into pages and pages of Carburetor how-tos and endless paragraphs. Carburetors are simple yet complex and they are affected by
many factors such as ambient temperature, altitude, fuel supply, condensation and a million other things. The best advice I can generally give
is to understand on a basic level how Carburetors work and get your Carburetor to FACTORY SPECS before attempting anything, that is IF your
RAPTOR IS COMPLETELY STOCK and the exhaust and intake have not been modified. Nothing sucks more than trying to get a Raptor running right only
to find someone messed up the Carburetor jet or float or 'ported' something in the carb to get more power and it may NEVER RUN right after. Get
a BASELINE FIRST of the carb running right THEN make changes and you can always revert BACK to FACTORY if you cannot get the carb to run right
after changing something.

I will break down the Carburetor into several sections;

1. Know how Carburetors operate in a basic level.
2. Know what your Raptor Carburetor is, how it works and the parts inside.
3. How to disassemble the Raptor and get to the carb to clean it and how to determine if you need to rebuild the carb when cleaning wont work.

=======================

1. Know how Carburetors operate in a basic level.

Go on youtube and lookup ATV Carburetor videos. Theres alot out there but they all are basic and have similar things inside. Make sure you can
understand how fuel gets into the carb, how its metered into the carb that is, and what the float and and float bowl does, what each one of the
JETS INSIDE do and why there's different sizes.

2. Know what your Raptor Carburetor is, how it works and the parts inside.

SPECIAL NOTE: There is some confusion on what the internal jets and screws and parts inside the Carburetor are. Some call them 'jets' and some
call them 'pilots' and some call them 'jet needles' or just 'needles'. I CANNOT go into what means what just be aware you need to look at how
Yamaha calls them and use that as the reference. Mostly I MATCH the SIZE as each JET is different size.

- Raptor 350s have a BSR36 Carburetor made by Mikuni and sold to Yamaha.
- The Factory MAIN Jet is a #142.5.
- The Factory Pilot Jet is #22.5
- Pilot Fuel Screw Factory is Set 2.25 or 2 and 1/4 turns out from bottom
- Starter Jet #70
- Fuel Level in Bowl is 4-5MM above the float chamber mating surface (this matters if youre engine is being starved for fuel on acceleration)
- Float hight is 13mm (same reason as before)
 

Attachments

#24 ·
Raptor 350 Carburetor Information, Jets, Cleaning and Rebuild Information from Yamaha Owners and Service Manual

==================================================

Part Two, Part One is in the prior post above.

(I will repeat this again from the first post)

I could easily go into pages and pages of Carburetor how-tos and endless paragraphs. Carburetors are simple yet complex and they are affected by
many factors such as ambient temperature, altitude, fuel supply, condensation and a million other things. The best advice I can generally give
is to understand on a basic level how Carburetors work and get your Carburetor to FACTORY SPECS before attempting anything, that is IF your
RAPTOR IS COMPLETELY STOCK and the exhaust and intake have not been modified. Nothing sucks more than trying to get a Raptor running right only
to find someone messed up the Carburetor jet or float or 'ported' something in the carb to get more power and it may NEVER RUN right after. Get
a BASELINE FIRST of the carb running right THEN make changes and you can always revert BACK to FACTORY if you cannot get the carb to run right
after changing something.

I will break down the Carburetor into several sections;

1. Know how Carburetors operate in a basic level.
2. Know what your Raptor Carburetor is, how it works and the parts inside.
3. How to disassemble the Raptor and get to the carb to clean it and how to determine if you need to rebuild the carb when cleaning wont work.

=======================
1. Covered in previous post
2. Covered in previous post
3. How to disassemble the Raptor and get to the carb to clean it and how to determine if you need to rebuild the carb when cleaning wont work.

a. I have looked and there really isnt step by step instructions on how to rebuild a Raptor 350 carb or a video. There are some warrior steps and videos but I havent been able to find them. Also, even my carb rebuild kit for my raptor 350 didnt come with instructions. So yeah. Basically, I located each seperate item in my rebuild kit, once I opened the carb float bowl up, and replaced each part being VERY careful not to strip anything or break anything or force anything. Its a carb, not a prom date, dont force it to do something it doesnt want to do.

b. I used these carb rebuild guides with the first being the SAME carb in the Raptor 350s and its great.

http://www.off-road.com/atv/tech/atv-tech-basic-carburetor-cleanup-52101.html

This one is more of a general guide but has good information:
http://hubpages.com/games-hobbies/HowToCleanYourATVCarburetor

And this one is good too and has a video:
https://www.rockymountainatvmc.com/rm-rider-exchange/clean-carburetor-motorcycle-atv/

Do you have to uninstall the carb from your Raptor to clean or rebuild it. NO.

Most people loosen up the intake boots (the boot that connects the air filter to the carb, and the head intake boot (the boot that connects the carb to the head) and rotate the carb to the RIGHT (if you're sitting on the Raptor you would TILT the carb to the RIGHT making the bottom of the carb swing out from the bottom position toward your left side).
 

Attachments

#25 ·
Carburetors General Jetting

==================================================

Below is a GENERAL Information regarding JETTING that is NOT specific to the raptor 350 but a general guide.

1) Pilot jet/slow jet – Affects mixture from idle to 1/3 throttle opening. The pilot jet meters fuel to the “bottom end circuits”

2) Air screw – Meters air to pilot jet. It is usually located near the back or air box side of the carb. Turning in clockwise, will richen the pilot mixture. Turning out, counter clockwise, will lean out the pilot mixture. Average setting for most 2 strokes is 1 to 2 1/2 turns out. Refer to owner’s manual.

Note: If the adjustment screw is in the front of the carb, it is a fuel screw and not an air screw; it is adjusted the opposite of the air screw. Most 4-strokes are this way.

3) Jet needle aka Needle – Affects the mixture from 1/4 throttle to full throttle. The needle is in the leanest position when the clip is on the top, and richest on the bottom. The needle calibrates the full to the change in throttle valve (slide) opening. The further down the needle is, the later the main jet comes on and the leaner the mixture at that point.

4) Main Jet – This circuit affects the mixture from 1/2 throttle to full throttle. This is your full blast top end circuit. This circuit is most accurately tuned by checking the plug for the correct color, sort of mocha brown.

5) Float/Float valve/Float level – Your owner’s manual has the correct level and procedure for calibrating your bike. Here are some symptoms that would indicate the need for float adjustment.

A) If float level is too high, the float bowl overflows out the drain hoses, and fuel often blocks the air passages that allow the carb to de-pressurize. This causes a bog, or hiccup over large hits.

B) If float level is too low, the engine starves for fuel off idle, causing a “boooooowang” sound very similar to a pilot jet or air screw set too lean.

Jetting Guidelines; Eliminating the variables.

1) Never change more than one circuit at a time. You need this tool to tell you exactly which circuit is affecting performance and at what throttle opening.

2) Use fresh gas. Octane ratings diminish with time and the higher the octane the slower the burn and richer the mixture. The quality of today’s pump gas is decreasing. To compensate for the fuel, richer jets are required. Also note that fuel with ethanol (aka MTBE) also requires a slightly richer mixture.

3) Always start with a fresh air filter. Let a freshly oiled air filter dry at least 6 hours in advance so that the alcohol in the air filter can evaporate. Then match the carb to a motor that breathes properly. Otherwise, the engine will run slightly leaner when the clean air filter is installed.

4) When performing a plug check, use a good used spark plug. New plugs are white and are hard to read accurately for mixture checks. If you have to use a new plug be sure to put at least 15 to 20 hard minutes on it before attempting to get a reading.

5) Always check for clogged carb vent lines. Clogged lines will cause hard starting and bogging when the motor is hot. They can also cause erratic running that seems to mimic a mis-adjusted float, but worse. Performance will seem rich and acceleration will be sluggish off idle.

6) If you’re trying to track down a jetting problem, don’t change your premix oil brand or the ratio. The pre-mix ratio will determine how much fuel is available to be burned because the oil isn’t burned, and in terms of liquid volume, the oil takes up a portion of the liquid (oil + fuel). While the ratio will have a minimal impact when making small changes, remember that you’re trying to eliminate variables.

How to Jet

1) Mark your throttle housing and grip in 1/4 turn increments. Use a marker, razor blade, etc.

2) Now get the motor to operating temperature by riding around, away from the pits.

3) Once the motor is warm, ride in 2nd and 3rd gear from the low RPM to high RPM. This puts a good load on the motor and is an accurate test of performance.

* try to notice if the problem gets worse or better as the motor heats up.

4) Now try to locate the throttle opening at which the problem exists. See details just below.

Rich Jetting Symptoms and Solutions

A) Motor won’t idle and idle set screw is ineffective. Try leaning out the air screw by turning it counter clockwise a quarter turn at a time. If the air screw has no effect, install a leaner pilot jet and return the air screw to 1 turn out. Proper air screw settings are usually between 1 and 2 1/2 turns out. The correct pilot for your bike is one that allows instant off-idle throttle response, and allows the air screw to be effective between 1 and 2.5 turns out. If the problem still exists, check and clean the choke circuit and carb vent lines.

B) Motor stumbles off idle to 1/2 throttle, then cleans up. If everything in part A above is correct, check the needle. Stock position is usually in the middle, but check your owner’s manual to be sure. To lean out the needle, you need to raise the clip. If the needle is dropped all the way lean and problem still exists, try a leaner needle.

C. Motor will rev through the mid range then becomes gurgley (technical term) at full throttle and power is sluggish. This is a text book example of a rich main jet. This problem often occurs when an air filter becomes clogged and gets worse as the motor heats up. Choose a main jet with a smaller number and lean out the air fuel mixture one step at a time. If the problem still persists even though it’s improved a little, reinstall your original main jet and lean out the needle one position. Now fine tune the main jet with plug checks.

Plug checks are the key to fine tuning the main jet once the other circuits are set.

White Porcelain Chocolate Mocha Brown Black/Wet

Lean Perfect! Rich

Look for symmetrical burn patterns, smell for odors like burnt plastic, which is actually tranny fluid and would be indicative of a blown seal.

Lean Jetting Symptoms and Solutions

A) Motor hesitates off idle with a “Boooooooooowang” sound. This is a lean symptom and often occurs when a motor is cold. Try turning the air-fuel screw clockwise a quarter turn richer and check throttle response again until motor revs without hesitation. If the motor “hangs up” or doesn’t come right back down to idle, install a richer pilot, and reset air screw.

B) Motor knock knock knocks at idle when hot. Try solution A. If problem persists, perform a “leakdown pressure test” to check for ignition crank seal leakage.

C) Motor revs clean and crisp but runs really hot and lacks power. This symptom indicates a lean main jet and/or needle. Use a richer main jet and/or needle setting. This is the most common misconception about two stroke jetting: When a motor runs excessively hot and lacks power, it is on the verge of seizing. If you are on the trail and don’t have the right main jet, try raising the needle by lowering the clip. It won’t be exact but at least you won’t seize.

Note: To be certain that your problem is lean, pull on the choke and see if the problem gets better or worse. If better, your problem is a lean condition.
 

Attachments

#28 ·
Yet another Jetting from joequad16 I think this is for Dual Raptor 660 Carbs but 660s simply have two 350 carbs. I like this one though.

=============

Pilot Screw - Idle
Pilot Jet - Idle to 1/4 throttle
Needle Jet and Jet needle - 1/4 to 3/4 throttle
Main Jet - 3/4 to full throttle

1) Idle Screw
Allow the engine to reach operating temperature. turn to smooth idle. If unable to obtain smooth idle, go to Step 2, Pilot Screw

2) Pilot Screw
If unable to obtain smooth idle: turn the pilot screw in all the way GENTLY until it bottoms, then turn the pilot screw 1/4 turn at a time until achieving a smooth idle. The pilot screw should be correct between 1- 2.5 turns. If idle is between 1-2.5 turns, the jump to step 4, Main Jet. If idle is NOT smooth between 1-2.5 turns, then jump to step 3, Pilot/ Slow jet.

3) Pilot/Slow Jet
If idle is not smooth with pilot screw between 1-2.5 turns, then the pilot/slow jet needs to be changed. There are 2 choices. either A or B
A - If the pilot screw has been turned more then 2.5 turns to smooth the idle, then install a bigger Pilot.
B - If the pilot screw has been turned less the 1 turn to reach smooth idle, then install a smaller Pilot.

Note! A larger pilot jet will eliminate the popping sound that may occur when letting off the throttle.
A larger will improve cold-weather starts.

4) Main Jet
Start with the richest (largest numbered) main jet and test at full throttle. the engine should "stumble" at wide open throttle (If engine does not stumble, then the engine is not rich enough and a larger main jet should be installed). Once you have a rich "stumble", install the next smaller jet one size at a time until full throttle results in normal operation. Once main jet step is complete, go back to step 2, Pilot Screw, and perform pilot screw adjustments one last time.

Note! If quad runs faster at 3/4 throttle then at Full throttle, then the jets are lean and a larger jet must be installed.

Needle
If carburetor has an adjustable needle, this step CAN be performed. If you have a slight hesitation but NOT a hard stumble between 1/4 -3/4 throttle, then the needle is probably lean. Raise the needle by lowering the clip.

Reading Spark Plugs
Once the main jet is set correctly by dropping a main jet size after the "stumble", confirm the jetting of the engine by reading the spark plug. This works best in top gear in a slight uphill area. After running at full throttle, do the following at the same time: pull in the clutch and stop the engine, DO NOT LET THE ENGINE IDLE! Remove the spark plug amd examine the color. It should be a Light Tan. If it is white, then the engine is running lean and a bigger Main Jet must be installed. If the color is Black, then the engine is running rich and a smaller Main Jet must be installed.